
Expose your Kubernetes Ingress Controller with HAProxy and Cloudflare
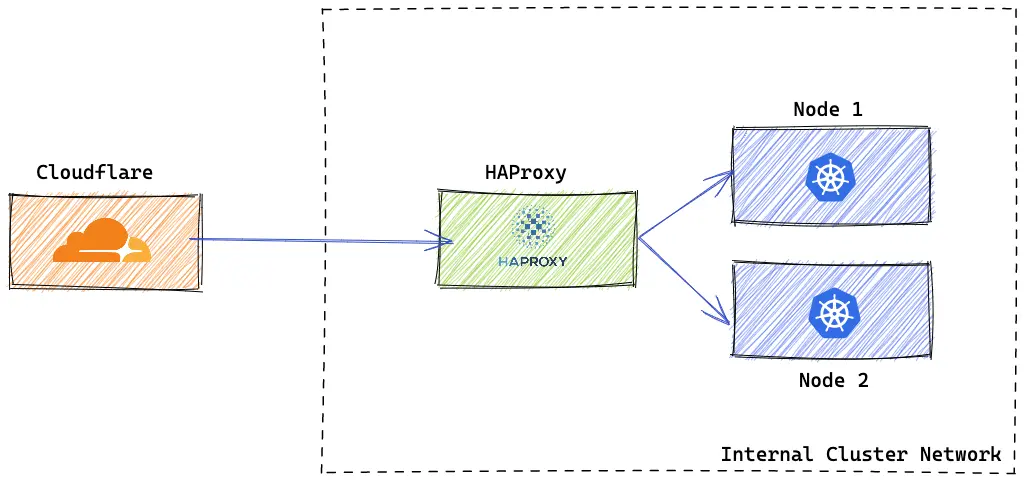
In the previous article (link), we deployed a Kubernetes Cluster by Kubespray on OpenStack. Now, our cluster is in a private subnet, so we cannot reach it from the outside. We will install an NGINX Ingress Controller to expose our applications, and to reach to the Ingress Controller we will install a HAProxy in front of our kubernetes workers that has both internal and external connectivity.
Other solutions to expose your Kubernetes Services on internet:
- LoadBalancer Service (Octavia Load Balancer on OpenStack) - cloud-provider-openstack
- Ingress Controller via Load Balancer (Octavia Ingress Controller) - octavia-ingress-controller
This time we assume we don’t have Octavia Load Balancer, so we need to create our HAProxy load balancer on an instance in front of our worker nodes and direct the traffic to the NGINX Ingress Controller
Prequiresitions
- OpenStack Provider (Cloudify.ro in my case)
- an Kubernetes Cluster up and running deployed by Kubespray with Terraform and Ansible on OpenStack
1. Install NGINX Ingress Controller
We deployed Kubernetes with Ansible, so we are going to install NGINX Ingress Controller with Ansible
1
$ vi /inventory/$CLUSTER/group_vars/k8s_cluster/addons.yml
1
2
3
ingress_nginx_enabled: true
ingress_nginx_host_network: true
ingress_publish_status_address: ""
Go to your kubespray directory to run ansible
1
$ ansible-playbook --become -i inventory/$CLUSTER/hosts cluster.yml --tags apps,ingress-nginx,ingress-controller
2. Create Load Balancer with HAProxy
Create your instance which will be your Load Balancer in front of kubernetes worker nodes.
2.a. Create Instance
We have an Openstack Router with interfaces between the internal k8s network and external network. So we will create an Instance on the internal k8s network and then create and attach an OpenStack Floating IP to our instance.
1
2
3
4
5
6
7
8
9
10
11
12
13
14
15
16
# Create the Server
$ openstack server create --flavor m1.c-4c-4g \
                        --image docker-ubuntu-20.04 \
                        --network <k8s-private-network \
                        --key-name <your-ssh-key> \
                        --description "HAProxy LoadBalancer for Kubernetes Workers" \
                        k8s-haproxy-workers

# Create OpenStack Floating IP in the public pool
$ openstack floating ip create public

# Look for the server port from the internal network
$ openstack port list --device-id <your_server_id>

# Attach the Floating IP to instance port
$ openstack floating ip set  --port <your_port_server> <floating-ip> (Floating IP to modify (IP address or ID))
2.b Configure Cloudflare
You have to register your domain on Cloudflare in order to add your DNS record and generate certificates. Here are the instructions
2.b.1 Configure DNS Record for your added domain (documentation)
- Type: A
- Name: k8s
- Content:
<your-floating-ip-instance>
2.b.2 Configure Edge Certificate
- Always Use HTTPS: True
- Automatic HTTPS Rewrites: True
- Your SSL/TLS encryption mode is Full (SSL/TLS - Overview)
2.b.3 Generate Origin Certificates
This TLS certificates will be installed on our HAProxy instance for encryption between Cloudflare and our origin server.
To generate the certificates use this instructions
2.c. Install HAProxy
Access the created instance via SSH
1
$ ssh ubuntu@<your-floating-ip-instance>
Create HAProxy directory
1
2
$ mkdir haproxy
$ mkdir haproxy/certificates
We store our origin certificates generated by Cloudflare
1
$ vi haproxy/certificates/domain.com.pem
Paste in the Origin Certificate and Private Key:
1
2
3
4
5
6
7
8
-----BEGIN CERTIFICATE-----
...
...
-----END CERTIFICATE-----
-----BEGIN PRIVATE KEY-----
...
...
-----END PRIVATE KEY-----
Create HAProxy Configuration
1
$ vi haproxy/haproxy.cfg
1
2
3
4
5
6
7
8
9
10
11
12
13
14
15
16
17
18
19
20
21
22
23
24
25
26
27
28
29
30
31
32
33
34
35
36
37
38
39
global
  stats socket /var/run/api.sock user haproxy group haproxy mode 660 level admin expose-fd listeners
  log stdout format raw local0 info
  crt-base /etc/haproxy/certificates/

defaults
  mode http
  option httplog
  option dontlognull
  option forwardfor
  timeout client 30s
  timeout connect 5s
  timeout server 30s
  timeout http-request 10s
  log global

# HAProxy stats
frontend stats
  bind *:8404
  stats enable
  stats uri /
  stats refresh 10s

# HTTPS Frontend for Kubernetes Worker Nodes
frontend k8s_lb_worker_nodes_https
  bind :443 ssl crt domain.com.pem # Origin Certificates
  acl service ssl_fc_sni k8s.domain.com # Your domain registered on Cloudflare

  use_backend k8s_worker_nodes if service

  # This redirects to a failure page
  default_backend backend_no_match

backend backend_no_match
    http-request deny deny_status 403

backend k8s_worker_nodes
  server k8s_worker_node_1 <worker_node_1_ip>:80 check # Your Internal IP worker node
  server k8s_worker_node_2 <worker_node_1_ip>:80 check # Your Internal IP worker node
3. Run HAProxy
Run HAProxy with Docker
1
2
3
4
5
6
$ cd haproxy
$ sudo docker run -d \
   --name haproxy \
   -v $(pwd):/usr/local/etc/haproxy:ro \
   -p 443:443 \
   haproxytech/haproxy-alpine:2.4
Test Connectivity
1
$ curl https://k8s.<your-domain.com>
1
2
3
4
5
6
7
<html>
<head><title>404 Not Found</title></head>
<body>
<center><h1>404 Not Found</h1></center>
<hr><center>nginx</center>
</body>
</html>
Now, we can expose our applications via Ingress Controller
For HAProxy Cluster with high availability - link
References