
Deploy Kubernetes Cluster on OpenStack using Kubespray
In this article, you will learn how to deploy Kubernetes using Kubespray on OpenStack Cloud. Kubespray is a tool that provides a set of Ansible playbooks, inventory, provisioing tools to deploy a production-ready Kubernetes cluster. It is a nice tool to deploy a Kubernetes cluster on OpenStack. There are also other tools for deploying Kubernetes such as kOps and Kubeadm.
We will use Terraform for creation of OpenStack infrastructure and Ansible for deploying the Kubernetes. For OpenStack Provider I will use Cloudify.ro.
Cloudify.ro is a Romanian Cloud Company based on OpenStack cloud which provides a lot of services (such as API access, Octavia Load Balancer, Object Storage, Dedicated Servers and so on) and great performances. (Cloudify offers 100 EUR credit bonus at signup)
1. Requirements
First, we have to look at the prerequisites for the deployment.
Kubespray requires the following components:
- OpenStack Provider (Cloudify.ro in my case)
- Python 2.7 (or newer)
- Terraform 0.11 (or newer)
- Ansible 2.7 (or newer)
- Jinja 2.9 (or newer)
You can install manually the prerequisites or you can use kubespray-openstack-starter which helps us to create a docker image with all tools that we have nedeed in order to deploy and manage our infrastructure.
2. Setup Environment
2.a. Prepare our environment manually
1
2
3
4
5
6
7
8
9
10
$ sudo apt update
# Install Ansible
$ sudo apt install ansible
# Install Terraform
$ sudo apt install terraform
# Install OpenStack Client
$ sudo pip install openstackclient

$ git clone https://github.com/kubernetes-sigs/kubespray
$ sudo pip install -r requirements.txt
2.b. Prepare our environment with kubespray-openstack-starter
kubespray-openstack-starter is a toolbox which contains all we need to deploy and manage our Kubespray infrastructure.
Firstly, we need to clone kubespray-openstack-starter
1
$ git clone https://github.com/DragomirAlin/kubespray-openstack-starter.git
Then go to kubespray-openstack-starter
1
$ cd kubespray-openstack-starter
Now, we need to clone kubespray repository
1
$ git clone https://github.com/kubernetes-sigs/kubespray
2.b.1 Your OpenStack credentials
Generate your application credentials from your OpenStack provider
1
2
3
4
5
6
7
OS_AUTH_TYPE=v3applicationcredential
OS_AUTH_URL=
OS_IDENTITY_API_VERSION=
OS_REGION_NAME=
OS_INTERFACE=
OS_APPLICATION_CREDENTIAL_ID=
OS_APPLICATION_CREDENTIAL_SECRET=
2.b.2 Build Toolbox
We have to build our image
1
$ docker-compose build infra
2.b.3 Run Toolbox
1
$ docker-compose run infra
Now, we have all we need in the docker container.
3. Setup Cluster
The following commands have to be executed in the container/our machine repository directory, we need to fill $CLUSTER var
In kubespray-openstack-starter approch we set the $CLUSTER as env variable, if you did manual installation, export your cluster name:
1
$ export CLUSTER=<your-cluster-name>
Go into kubespray directory and create your inventory
1
2
3
4
5
$ cd kubespray
$ cp -LRp contrib/terraform/openstack/sample-inventory inventory/$CLUSTER
$ cd inventory/$CLUSTER
$ ln -s ../../contrib/terraform/openstack/hosts
$ ln -s ../../contrib
Now, we have to edit our invetory vars
1
$ vi inventory/$CLUSTER/cluster.tfvars
I use Cloudify.ro as OpenStack Provider
Get flavors, images and network information from your provider.
1
2
3
4
5
6
7
8
9
10
11
# Your OpenStack Credentials
$ source openrc

# Get the flavors that you want
$ openstack flavor list

# Get the images that you want
$ openstack image list

# Get public network
$ openstack network list
- Image for nodes:
base-ubuntu-20.04 - Bastion flavor:
m1.g-2c-4g(id:10002) - Kubernetes nodes flavor:
m1.g-8c-16g(id:10004) - Public network is called
public(id:0a92fd7a-9d60-4dcf-ba3f-cdc7ba86e551) and the floating ip pool is the same as public.
1
2
3
4
5
6
7
8
9
10
11
12
13
14
15
16
17
18
19
20
21
22
23
24
25
26
27
28
29
30
31
32
33
34
35
36
37
38
39
40
41
42
43
44
45
46
47
48
49
# Your Kubernetes cluster name here
cluster_name = "<your-cluster-name>"
# List of availability zones available in your OpenStack cluster
#az_list = ["nova"]
# SSH key to use for access to nodes
public_key_path = "~/.ssh/id_rsa.pub"
# Image to use for bastion, masters, standalone etcd instances, and nodes
image = "base-ubuntu-20.04"
group_vars_path="/<path>/kubespray/inventory/<your-cluster-name>/group_vars"
# 0|1 Bastion nodes
number_of_bastions = 1
flavor_bastion = "10002" # m1.g-2c-4g
# Standalone Etcds
number_of_etcd = 0
# Master Nodes
number_of_k8s_masters = 0
number_of_k8s_masters_no_etcd = 0
number_of_k8s_masters_no_floating_ip = 1
number_of_k8s_masters_no_floating_ip_no_etcd = 0
flavor_k8s_master = "10004"
# Worker Nodes
number_of_k8s_nodes = 0
number_of_k8s_nodes_no_floating_ip = 2
flavor_k8s_node = "10004" # m1.g-8c-16g
# GlusterFS
# either 0 or more than one
#number_of_gfs_nodes_no_floating_ip = 0
#gfs_volume_size_in_gb = 150
# Container Linux does not support GlusterFS
image_gfs = "base-ubuntu-20.04"
# May be different from other nodes
#ssh_user_gfs = "ubuntu"
#flavor_gfs_node = "<UUID>"
# Networking
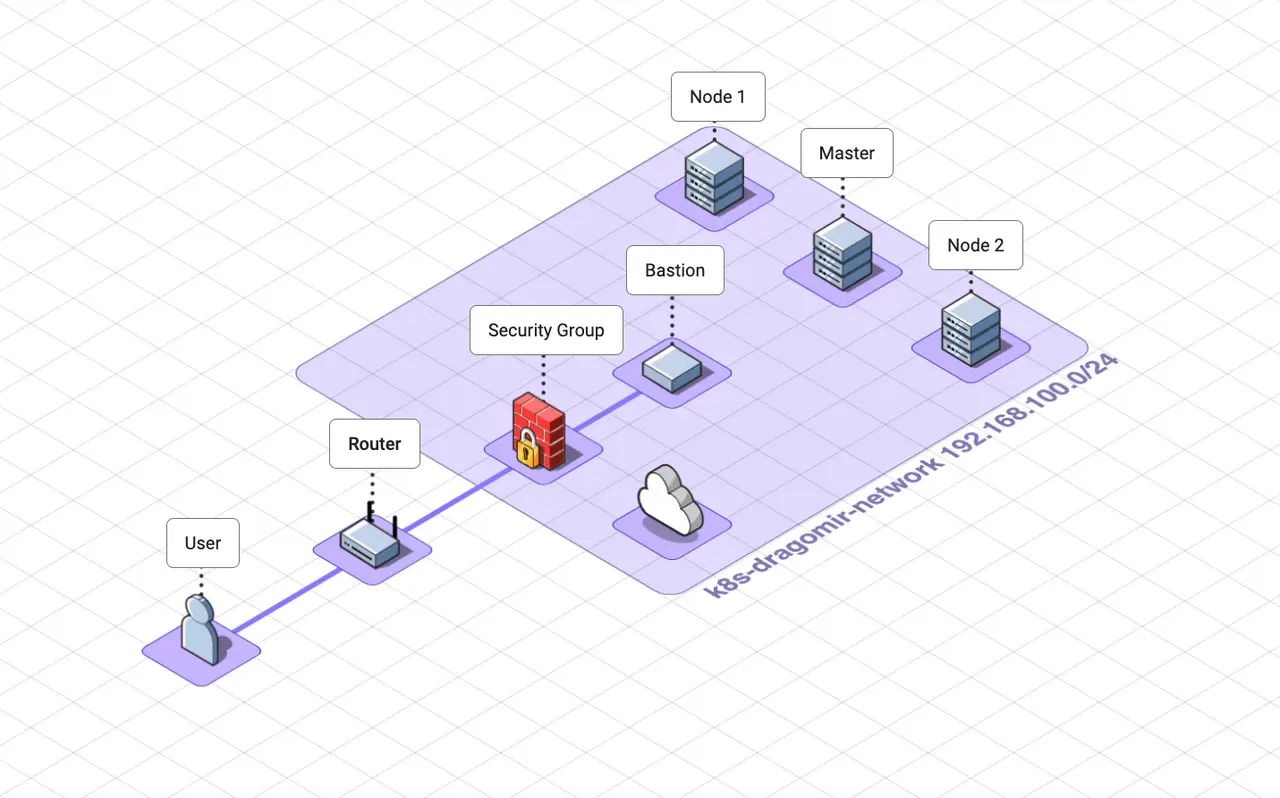
network_name = "k8s-dragomir-network"
external_net = "0a92fd7a-9d60-4dcf-ba3f-cdc7ba86e551" # public network
subnet_cidr = "192.168.100.0/24"
floatingip_pool = "public"
bastion_allowed_remote_ips = ["0.0.0.0/0"]
A detalied description of the variables can be found here link
Deploy Infrastructure with Terraform
We’ve already installed the terraform on our workstation.
To start the Terraform deployment go to your inventory directory kubespray/invetory/$CLUSTER
1
2
3
4
5
# terraform init
$ terraform -chdir="contrib/terraform/openstack" init -var-file=$PWD/cluster.tfvars

# terraform apply
$ terraform -chdir="contrib/terraform/openstack" apply -var-file=$PWD/cluster.tfvars
Before confirmation:
1
2
3
4
5
6
7
8
9
10
11
12
13
14
15
16
17
Plan: 25 to add, 0 to change, 0 to destroy.

Changes to Outputs:
  + bastion_fips        = [
      + (known after apply),
    ]
  + floating_network_id = "<floating-network-id>"
  + k8s_master_fips     = []
  + k8s_node_fips       = []
  + private_subnet_id   = (known after apply)
  + router_id           = (known after apply)

Do you want to perform these actions?
  Terraform will perform the actions described above.
  Only 'yes' will be accepted to approve.

  Enter a value: yes
After applying:
1
2
3
4
5
6
7
8
9
10
11
12
Apply complete! Resources: 25 added, 0 changed, 0 destroyed.

Outputs:

bastion_fips = tolist([
  "<bastion-ip>",
])
floating_network_id = "<floating-network-id>"
k8s_master_fips = tolist([])
k8s_node_fips = []
private_subnet_id = "<private-subnet-id>"
router_id = "<router-id>"
Move to your initial directory and check your nodes connectivity
1
2
$ cd ../..
$ ansible -i inventory/$CLUSTER/hosts -m ping all
Output:
1
2
3
4
5
6
7
8
9
10
11
12
13
14
15
16
17
18
19
20
21
22
23
24
25
26
27
28
k8s-dragomir-bastion-1 | SUCCESS => {
    "ansible_facts": {
        "discovered_interpreter_python": "/usr/bin/python3"
    },
    "changed": false,
    "ping": "pong"
}
k8s-dragomir-k8s-master-nf-1 | SUCCESS => {
    "ansible_facts": {
        "discovered_interpreter_python": "/usr/bin/python3"
    },
    "changed": false,
    "ping": "pong"
}
k8s-dragomir-k8s-node-nf-2 | SUCCESS => {
    "ansible_facts": {
        "discovered_interpreter_python": "/usr/bin/python3"
    },
    "changed": false,
    "ping": "pong"
}
k8s-dragomir-k8s-node-nf-1 | SUCCESS => {
    "ansible_facts": {
        "discovered_interpreter_python": "/usr/bin/python3"
    },
    "changed": false,
    "ping": "pong"
}
Deploy Kubernetes with Ansible
We have our infrastructure up and running by Terraform and now we need to install Kubernetes with Ansible.
We provide here a simple configuration but in the next articles we will add more compoments and tools to our cluster. For a full list of options, refer to the Kubespray Documentation.
Update group_vars/all/all.yml
1
2
cloud_provider: external
external_cloud_provider: openstack
Update group_vars/all/openstack.yml
1
2
cinder_csi_enabled: true
cinder_csi_ignore_volume_az: true
Deploy Kubernetes
You are ready to deploy Kubernetes. It will take about ~12 minutes.
1
2
$ cd ../..
$ ansible-playbook --become -i inventory/$CLUSTER/hosts cluster.yml
Access your Kubernetes Cluster
By default, Kubespray configures kube-master hosts with access to kube-apiserver via port 6443 as http://127.0.0.1:6443. You can connect to this from one of the master nodes.
Prerequisites:
- kubectl https://kubernetes.io/docs/tasks/tools/#kubectl
- kubectx and kubens (optional, to switch between clusters and namespaces in kubectl) https://github.com/ahmetb/kubectx
Access your bastion node
SSH into your bastion node
1
$ ssh -A ubuntu@<bastion-ip>
We have two different approaches to get the config for accessing the cluster
1. Copy the kubeconfig from master node
1
2
3
4
# Create ~/.kube directory
$ mkdir -p ~/.kube
# Copy the kubeconfig file
$ scp ubuntu@<master-ip>:/etc/kubernetes/admin.conf ~/.kube/config
After copying, edit the file for changing the master ip node.
1
server: https://<master-ip>:6443
2. Create configuration file
A configuration file describes clusters, users, and contexts.
If you didn’t choose the first approch, we will have to create the configuration file for authenticating with the cluster.
Copy the certificates from your master node:
1
2
3
$ ssh ubuntu@<master-ip> sudo cat /etc/kubernetes/ssl/apiserver-kubelet-client.key > client.key
$ ssh ubuntu@<master-ip> sudo cat /etc/kubernetes/ssl/apiserver-kubelet-client.crt > client.crt
$ ssh ubuntu@<master-ip> sudo cat /etc/kubernetes/ssl/ca.crt > ca.crt
Set cluster
Enter these command to add cluster details to your configuration file:
1
2
3
4
$ kubectl config set-cluster k8s-cluster \
  --server=https://<master-ip>:6443 \
  --certificate-authority=ca.crt \
  --embed-certs=true
Set credentials
Add user details to your configuration file:
1
2
3
4
5
$ kubectl config set-credentials k8s-admin \
  --certificate-authority=ca.crt \
  --client-key=client.key \
  --client-certificate=client.crt \
  --embed-certs=true
Create context
Add context details to your configuration file:
1
2
3
$ kubectl config set-context k8s-context \
 --cluster=k8s-cluster \
 --user=k8s-admin
Set the current context:
1
$ kubectl config use-context k8s-context
Test Connection
Now whenever you enter a kubectl command, the action will apply to the cluster, and namespace listed in the context.
1
$ kubectl get nodes -o wide
1
2
3
4
NAME                           STATUS   ROLES           AGE   VERSION   INTERNAL-IP       EXTERNAL-IP   OS-IMAGE             KERNEL-VERSION     CONTAINER-RUNTIME
k8s-dragomir-k8s-master-nf-1   Ready    control-plane   17m   v1.25.4   192.168.100.52    <none>        Ubuntu 20.04.2 LTS   5.4.0-73-generic   containerd://1.6.9
k8s-dragomir-k8s-node-nf-1     Ready    <none>          15m   v1.25.4   192.168.100.164   <none>        Ubuntu 20.04.2 LTS   5.4.0-73-generic   containerd://1.6.9
k8s-dragomir-k8s-node-nf-2     Ready    <none>          15m   v1.25.4   192.168.100.242   <none>        Ubuntu 20.04.2 LTS   5.4.0-73-generic   containerd://1.6.9
Now we are ready to play with the Kubernetes Cluster.
If you have any questions or see something wrong, let me know. 😄
References